
How to Study a Chess Tabiya In-Depth (and Why You Should)
How to turn one unclear position into a lasting source of chess understanding

Recently I played in the Midwest Class Championship and in my very first game I ran into a familiar chess feeling: I reached a position where I kind of knew what was going on…but not really.
It was late in the opening/early in the middlegame. We had reached a position I’d probably seen before in passing, maybe in a Chessable course or in a GM game I glanced at once. I knew the vague ideas (something about using the bishop pair and space advantage to attack the opponent’s kingside) but nothing concrete.
So I sat there, over the board, burning precious minutes, trying to come up with a “good plan.” Nothing felt right. What I ended up playing was fine but because of the time spent, I ended up falling behind on the clock (in a G/60 d10 game) and later drew a game I should’ve won.
But that position stuck in my head. It was the kind of moment you know you need to revisit. Not just with an engine but with real curiosity. So after the tournament, I decided to study that exact position (and a few more after it) as deeply as I could.
And through that process, I was able to emphasize something I had already known: learning how to study a tabiya (a key branching point in the opening or early middlegame) is a really good way to become a better chess player.
In this post I’ll walk you through how I approached it, what tools I used and why this kind of study leads to real, lasting understanding that carries over into future games.
Step 1: Identify the Position That Deserves Your Attention
The first step was simple: find the exact position where I first felt unsure of what to do during the game. Not three moves earlier when I was still in book. Not later when I was already in time trouble. The key is to stop at that first moment where you realize you were out of your depth.
That’s the position you want to study.
If you study from this mindset of “what position caused me problems?” then you’re working on something directly connected to your own growth, not just memorizing theory for the sake of it. You’re solving a real problem that actually came up in your play.
Let’s get into the first specific position I studied:
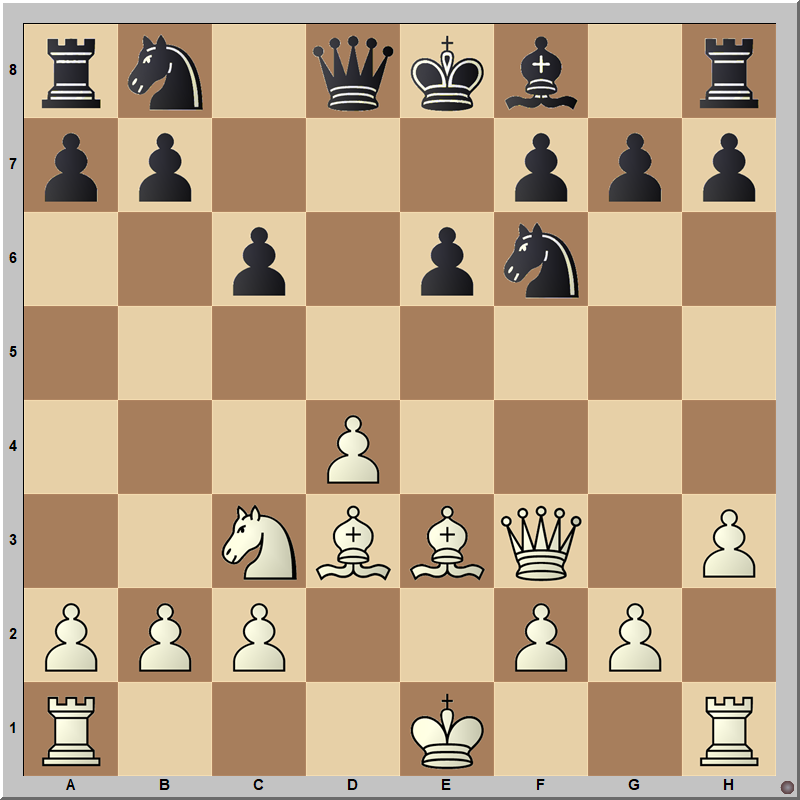
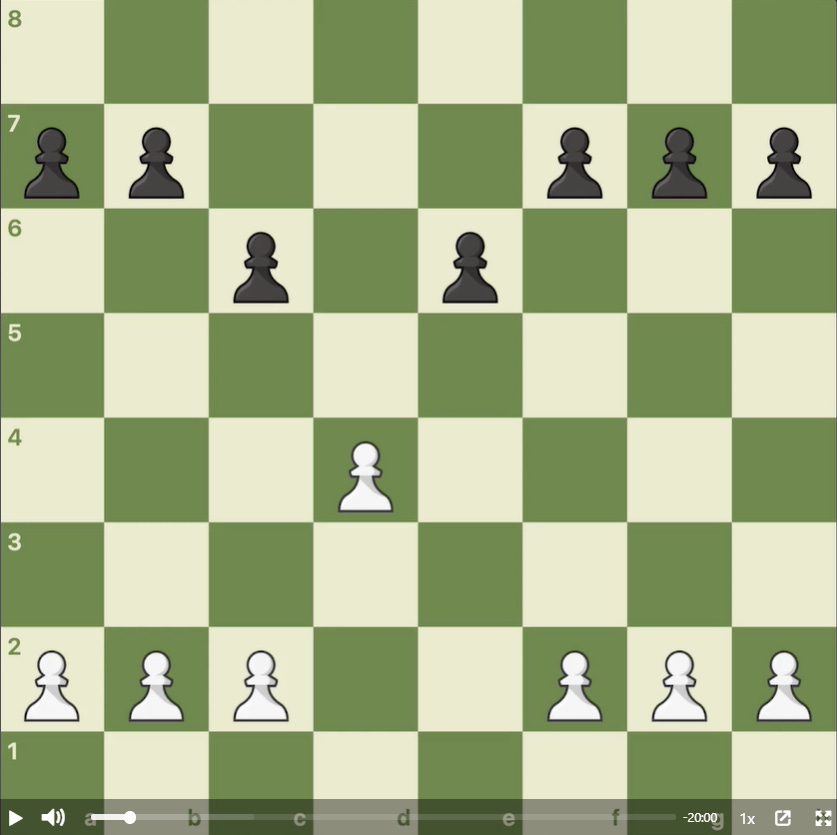
This position occurred after the opening moves 1. e4 d5 2. exd5 Qxd5 3. Nc3 Qd8 4. d4 Nf6 5. Nf3 Bg4 6. h3 Bxf3 7. Qxf3 c6 8. Be3 e6 9. Bd3.
Let’s first get our bearings on the position and breakdown the imbalances:
White has a lead in development
White has the bishop pair
White has a space advantage
It should be pretty obvious that White has the overall advantage here, even though it isn’t very large and Stockfish says it’s around +0.6 to +0.8 depending on what move we play next.
(By the way, if you want to learn how to get better at gaining and converting middlegame advantages like the ones mentioned above, I made a Chessable course on the topic earlier this year: https://www.chessable.com/seal-the-deal-how-to-gain-and-convert-middlegame-advantages/course/263577/)
But now we hit on our first decision point of the game: Do we castle kingside or queenside? During the game I castled kingside but when I later studied the position, I wanted to see what other strong players had played here in the past.
Step 2: Use Databases and Statistics for Clarity
Next, I dug into the numbers. ChessBase and lichess both let you view the win/loss/draw percentages from their massive game databases.
This might sound dry but it’s incredibly revealing.
Sometimes, a move you assume is “mainline” turns out to score terribly at your level or vice versa. Seeing what strong players actually do and how successful those choices are gives you a sanity check on your intuitions. It also helps you decide which lines are worth diving into deeply.
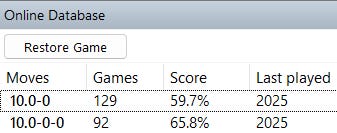
We can see across all three of these databases that castling queenside (despite being slightly less popular) scores a lot better than castling kingside. Ultimately this decision to castle kingside or queenside is a huge diverging point in the game. If you castle queenside then you are likely going to get an opposite-side castling middlegame (more dynamic) while if you castle kingside then it’s likely that both players will eventually be castled on the same side of the board (less dynamic).
Because of our initial lead in development, space advantage and bishop pair advantage, it seems that castling queenside is going to be able to help us emphasize these advantages more than castling kingside would be able to do.
Step 3: Play Through Games of Strong Players
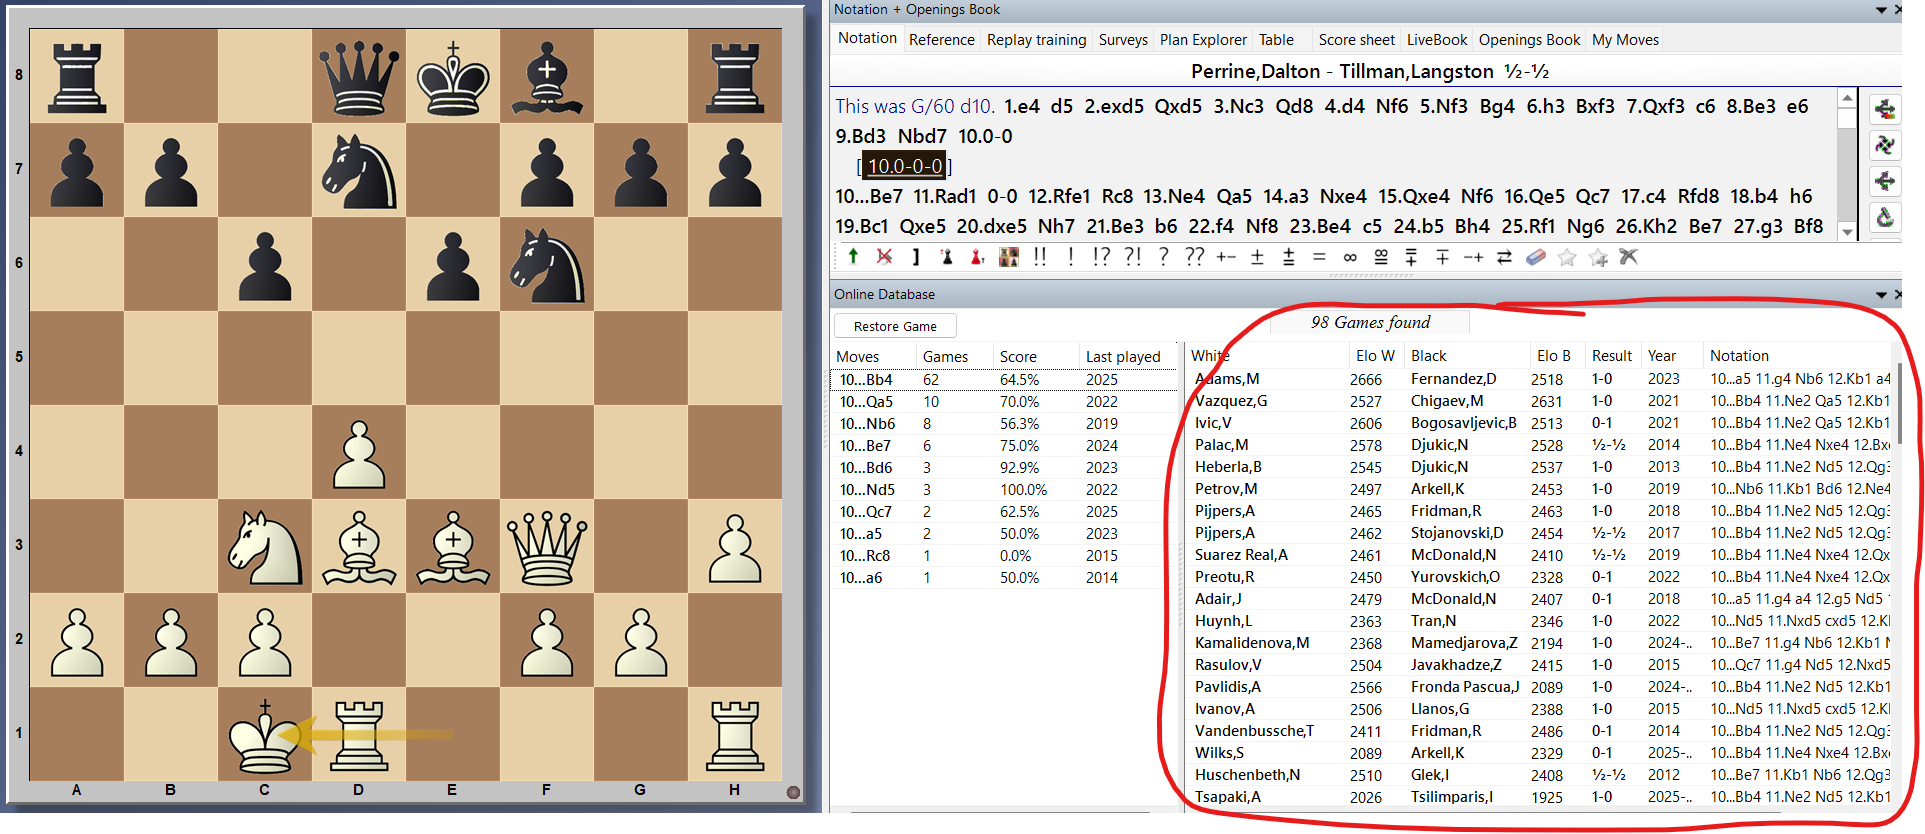
Now that I understood that castling queenside scored better in practical human games, I wanted to see how those games tended to play out.
So I again used ChessBase and lichess databases to look up how strong players handled the same setup. I wasn’t so concerned about the specific moves but was more interested in the overall flow of the games.
What are both sides typically trying to do?
Which pawn breaks tend to define the battle?
What are the most common middlegame plans?
This helped me build a narrative around the position. Instead of a random set of moves, I began to see a story: which side wants to attack, who should trade what, what kind of endings arise (if the game even goes that far).
It’s like zooming out before zooming in. You get a lay of the land before you start exploring every corner.
Now, because I had previous knowledge about how opposite-side castling positions tend to work, I already had an idea of how the games were likely to look (a lot of mutual attacking between White and Black) but still wanted to see them in action.
There are a few ways to play through these games:
Click through the moves quickly and try to absorb the consistent ideas
Play guess-the-move using one or more of the games (more on this in one of the bonus steps below)
If you can find and read annotations for any of these games then that’s ideal!
As you play through the games, really try to think about why certain moves were played. Focus on the understanding instead of any memorization.
Step 4: Explore with the Engine (Carefully)
Once I had a rough understanding of the main ideas and had done the groundwork, only then did I turn on the engine.
Engines are powerful but dangerous if used passively. If you just click through moves without thinking then you’ll learn nothing.
Instead, I had already seen how many other games played out in this opposite-side castling middlegame. However, because I hadn’t checked with the engine then I didn’t know if what these stronger players were doing was actually the most precise way of playing.
Also, when I thought about playing something different than what happened in the games I had clicked through, then I was able to turn on the engine and see how my move would have compared to the engine’s recommendation. When our moves differed, I asked myself why.
Why does the engine prefer this move over mine? What long-term factor did I miss? Is it about structure, activity, tactics or tempo?
These “why” questions are where the real learning happens.
Step 5: Reflect on What You’ve Learned
The last step (and maybe the most overlooked one) is to actually reflect on what you’ve learned.
After spending hours (or even days) studying a position, it’s tempting to just move on and assume the knowledge will stick. But reflection is what cements everything.
I like to ask myself a few questions once I’m done with a deep-dive like this:
What was the biggest misconception I had about the position before I studied it?
What new patterns or plans do I now understand clearly?
If I reached this position again tomorrow, how would my decision-making process be different?
What surprised me most?
Writing down your thoughts and answers in a notebook or a game annotation makes a huge difference. It transforms your study from passive absorption into active synthesis.
This step also helps separate memorization from understanding. For instance, maybe you learned that a certain pawn break works because of the control of a key square, not just because “that’s what a Grandmaster played” or “that’s what the engine recommended”. That kind of understanding will carry over to dozens of similar positions in the future.
When you take time to reflect, you’re not just logging what you learned. Instead, you’re building a mental map of your improvement. You’re saying, “Here’s how I’ve grown as a player.”
That’s a powerful habit to build.
Why This Kind of Study Sticks
Here’s the most important takeaway: this process wasn’t just about one game or one position.
By studying a tabiya in this active, multi-faceted way: using statistics, databases and engines, I wasn’t just memorizing moves. I was internalizing patterns.
Next time a similar structure arises, I won’t be fumbling in the dark. I’ll recognize the cues faster, trust my evaluation more and spend less time on the clock.
That’s the power of this kind of work. It transforms knowledge from something external (a move order in a file) into something internal (a felt sense of how the position breathes). Or as the cool kids say nowadays, it “turns knowledge into skill”.
It’s slow, deliberate and sometimes tedious but it’s also the most rewarding kind of chess study there is.
If there’s one piece of advice I’d give to anyone looking to improve, it’s this: Don’t just study openings. Instead, study positions.
Find the moments in your own games where you felt lost and do some digging. Use every tool available. Don’t be afraid to go deep.
Because when you do, you’re not just learning how to handle that one position. You’re training your chess intuition itself.
And that’s the kind of learning that lasts a lifetime.
If you want to go even deeper, then here’s a few extra bonus steps you can do before your final reflection:
Bonus Step 1: Learn the Pawn Structure Itself
Our first bonus step is to first begin by learning the pawn structure that defined the position.
For many people, I’d even put this step higher up in regards to priority since understanding pawn structures is a fundamental way of improving at chess.
My two best recommendations for learning any pawn structure in chess you can think of would be “Chess Structures - A Grandmaster Guide” by GM Mauricio Flores Rios (available on Forward Chess and Chessable) and the Chess.com video series “Every Pawn Structure Explained” by GM Johan Hellsten (link here).
Both resources emphasize the recurring plans, piece placements and typical maneuvers that show up again and again across openings and the pawn structures that arise from them.
Here’s a screenshot example from one of the videos that shows the same pawn structure as the position we analyzed above:
It’s interesting to note that while watching the “c3 Scandinavian Structure” video that GM Hellsten says at 1:30 into the video that in this structure “White is usually trying to play for an attack. For this reason, very often in this structure they like to castle long… When it’s possible, White often prefers to put the king on c1 because in that case they have more chances of using all their pieces in the kingside attack.”
Now I wish I had watched that video before playing the game!
If you understand the pawn structure of positions, then you have a better chance of knowing the typical ideas, maneuvers, plans and piece arrangements that are associated with that structure and can replicate those in your own game.
Bonus Step 2: Study Model Games and “Guess the Move”
Earlier I mentioned how playing through Grandmaster games is important for learning the typical ideas in the position you’re studying.
Before every move, you want to stop and think: “What would I play here?” Then compare your move with the grandmaster’s and more importantly, try to figure out or at least guess at their reasoning.
This kind of active engagement builds intuition like nothing else. You start to feel the rhythm of the position, not just know the theory behind it.
In regards to how we can actually do this, personally, I like to use qchess.net to find model games (https://qchess.net/modelgames) then bring the game(s) over to their guess-the-move lobby (https://qchess.net/guessthemovelobby) and play through the games in there.
Bonus Step 3: Go Beyond Analysis to Play the Position Out
The next bonus step is to play out the position you’ve been analyzing against the computer.
You can use lichess to do this. First setup the position, then click the “practice vs computer” button that looks like a target icon.
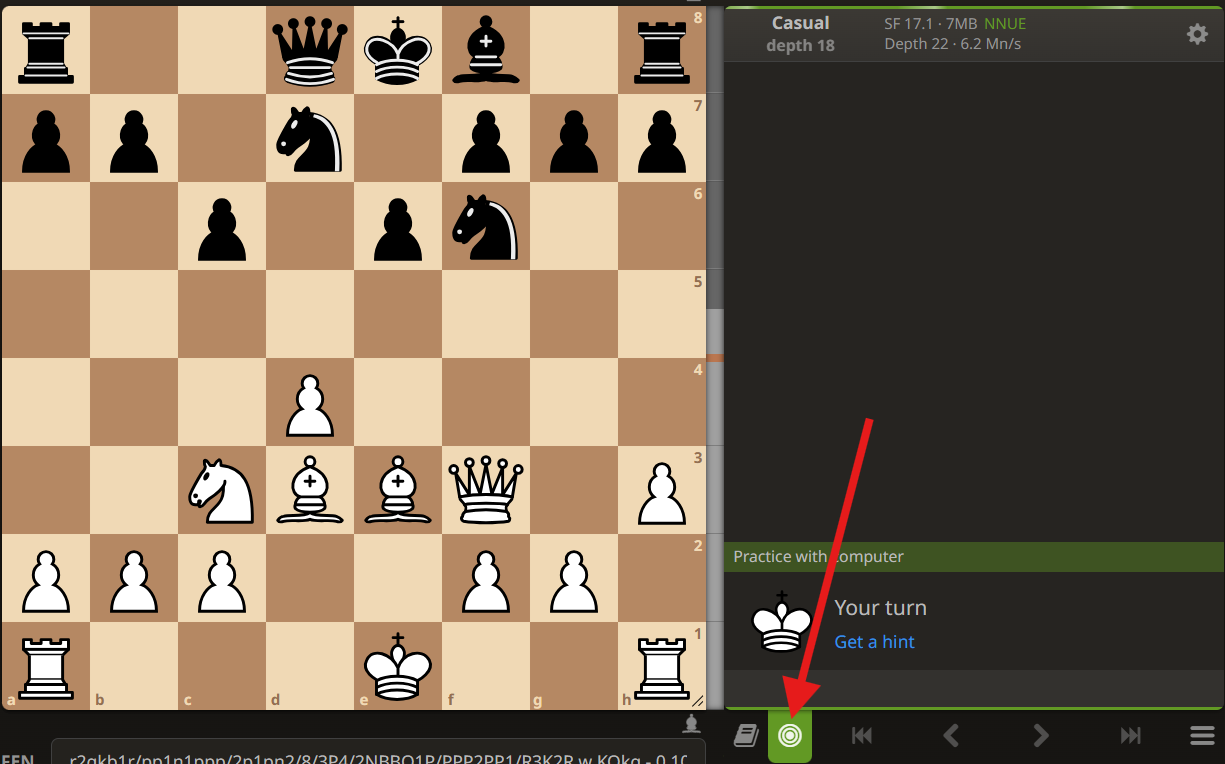
I recommend playing out one of the sides for a while, seeing how the engine played the other color then going back to the starting position, flipping the board, and trying to emulate what the engine did. It will beat you (again) and then you can learn how it defended against what you thought was the better way to play the position. Flip back and forth a few times so that you build up your skill in playing both sides of the position.
It’s amazing how much more you learn once you start playing from the same structure repeatedly. Moves that looked natural on paper suddenly feel clunky in practice. Other ideas that seemed strange start making perfect sense once you experience their flow over the board.
This step transforms passive knowledge into active skill.
Bonus Step 4: Talk It Through and Spar With Friends
The final bonus step is to integrate all of this into your personal chess community. Show a few friends the position, ask how they’d approach it and spar with them.
Explaining a position out loud is one of the best tests of understanding. If you can’t articulate why a move makes sense, you probably don’t fully understand it yet.
Sometimes my friends would point out ideas I’d missed. Other times I’d realize I actually knew more than I thought. Either way, the act of dialogue deepened my grasp of the ideas.
Don’t just read about improvement but instead, experience it! Contact me at NextLevelChessCoaching.com if you’re interested in coaching. Hope to talk soon!
Note to self- don't play the Qd8 Scandi against Dalton!
this is now part of my training: tactics, games and analysis, then position study. I want to be able to see what is relevant in a position, but can't right now