
Why Willpower Matters in Chess (Not What You Think!)
The importance of being proactive and not limiting ourselves


“I can’t do it”
”It doesn’t work”
”I have to defend”
”My opponent has this threat so I have to stop it”
”I don’t have time to do my plan”
”If I play this move then my opponent’s response will cause me trouble”
These types of thoughts during a game are all too common for club-level players. When we’re looking at a position we tend to come up with some ideas of what we want to play as well as what our opponent is trying to do. At a certain point during our calculation there comes an intersection of ideas and one of two things might go through our heads:
My opponent is threatening (insert move) so I can’t play (insert move I want to play)
I want to play (insert move) but it doesn’t work because of (insert opponent’s response)
However, what if I told you that strong players think differently here?
Let’s take a look at an example position:

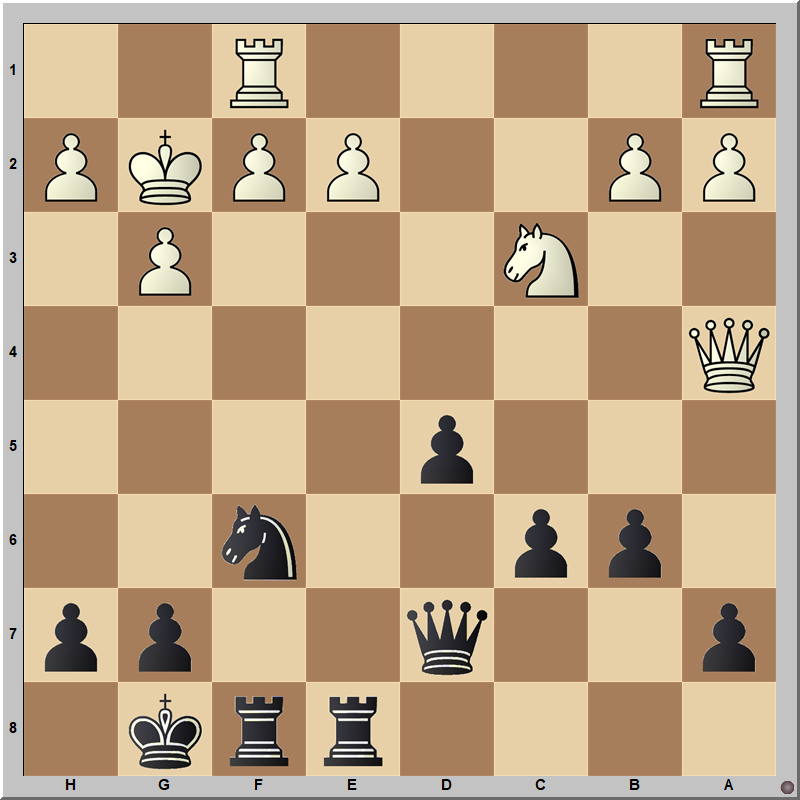
First of all, what is White threatening? If you noticed the threat of 1. e5 forking our knight and bishop then you’re off to a good start. In the current position this is a very real threat since something like 1…Bxf3 would be answered by 2. gxf3 and the fork would still persist on the e5-square. Black would lose a piece at that point.
So what do we do about this? Do we play 1…e5 to block the fork? What about 1…Nd7 to sidestep the threat? While there is nothing objectively wrong with these moves, are they moves that you really WANT to play? I don’t think so. Playing 1…e5 blocks in our d6-bishop and playing 1…Nd7 moves our knight back to a more passive location. These moves feel very reactive and once you get stuck in a reactionary spiral, it becomes difficult to break out of it.
Instead, what kind of moves do you WANT to play in the position? If 1. e5 wasn’t actually a problem for us, what would be examples of desirable moves here? I would think that moves like 1…Qc7 and 1…Rc8 look good. They both develop a new piece to an active location. The queen would line up with the bishop towards the h2-pawn and also put some pressure on white’s c2-bishop. The rook move would put it on an open file towards the c2-bishop once again. However, we still have this pesky e5 follow up from our opponent…or do we? Here’s where the willpower and calculation should kick in. Rather than automatically seeing our opponent’s threat and worrying about it (reactive) can we instead make the move that we WANT to play (…Qc7 or …Rc8) work with calculation (proactive)?
Here it ends up that we can! If we play 1…Qc7 then 2. e5? doesn’t work due to 2…Bxf3 3. gxf3 Bxe5 and now the queen on c7 helps us to win a pawn. Also, 3. exd6 Bxe2 4. dxc7 Bxf1 will result in us winning material as well. If we play 1…Rc8 instead, this is good too. Playing 2. e5? is still not a bother since we can play 2…Bxf3 3. gxf3 Bxe5! (the queen on e2 is overworked defending e5 and c2) 4. Bxh7+ Kxh7 5. Qxe5 Qd3 and while we’re not ahead a pawn in this variation, white’s pawn structure is destroyed and our pieces are very active.
The calculation here was nothing too fancy. The key though, was not automatically thinking in a reactive way and overly worrying about our opponent’s threat. Instead, a strong player will notice the threat but rather than worrying about it, they will instead think “how can I make a desirable move work with calculation?” In my opinion, this shift in thinking (proactive vs reactive) and combining it with willpower in calculation is one of the big differences between weaker and stronger players.
Let’s see another example:

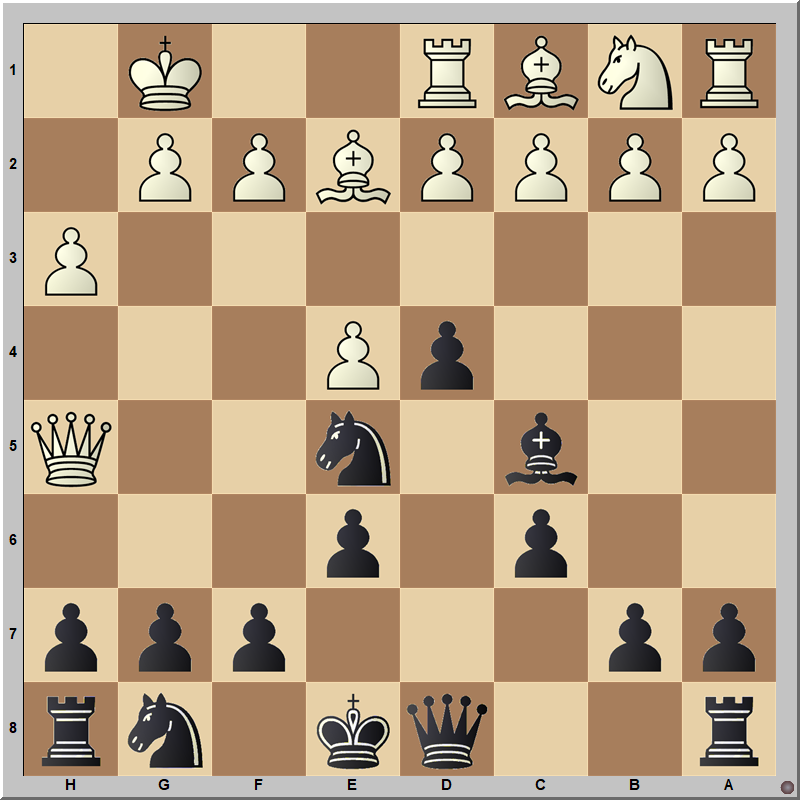
First of all, what is White threatening? It looks like white’s threat is to play 1. dxc5 winning the knight. Do we need to move the knight away and react to our opponent’s “threat”? No! If it was white’s move and they did execute their threat then we would be able to simply capture white’s bishop on a1 which isn’t defended. It ends up that the d4-pawn is pinned. Because of this, our knight is not really under attack which means that we don’t need to react to white’s “threat”. If we don’t need to react, then what move do we WANT to play here? What would be a positionally desirable move? I really like the move 1…Ba6 which prevents White from castling. If White was able to safely castle their king then they would be able to work towards converting their extra pawn advantage into a win later. However, if we prevent castling then we have good chances to use our dynamic advantage (piece activity and safer king) to create trouble for our opponent in the short-term.
So in these two examples so far we have seen situations where our opponent’s “threat” could be worked around without needing to stoop down to playing reactive or defensive moves. There is another type of situation in our thinking process that I I mentioned earlier that we should also be alert to. This is when there might be a desirable move that we want to play in a position but it doesn’t look like it works on first glance due to our opponent’s response.
Let’s seen an example of this:

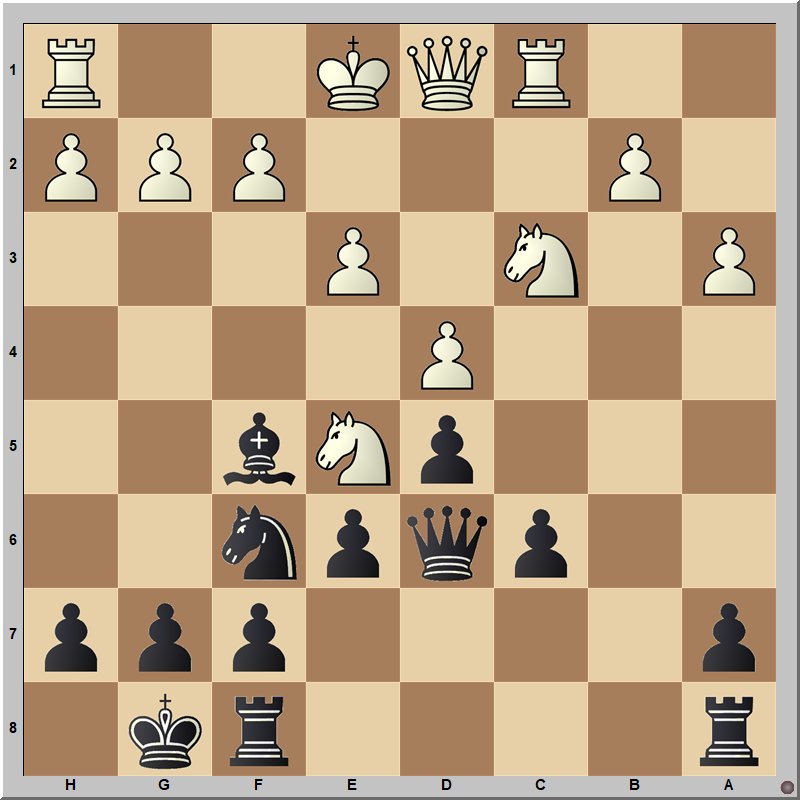
Before looking at any moves yet, let’s start by assessing the imbalances and features of the position. The quick summary here would be that we have the bishop pair (advantage) but also have a weak backwards pawn on d6 with a weak d5-square in front of it (disadvantages). When we think about certain plans that revolve around these imbalances they would be as follows:
Bishop pair → trade pawns and open the position
Weak pawn/square → trade off or eliminate the weaknesses
With these two general plans in mind, what is a move that would accomplish both plans? It would be the move 1…d5. This pawn break would result in trading a pair of pawns which opens the position for our bishop pair and simultaneously gets rid of our weaknesses on d5 and d6. However, on first glance it doesn’t look like this works. It seems pretty obvious that white is controlling the d5-square four times and we are only controlling it twice. Because of this, we might think that we need to prepare our …d5 idea with a move like 1…Rd8. While this move isn’t bad by any means, a good thing to think here about the move 1…d5 would be:
“What if I do it anyways?”
This is a key question to think about and I’ve heard it called the “Shankland Rule” referring to Grandmaster Sam Shankland. In many of the lessons him and I had together this was a recurring question that was important to answer. The key way to think here is: Can we make our positionally desirable move work with the backing of calculation? If we can pull off …d5 without needing to prepare it with …Rd8 then we would be able to accomplish our plans (open the position and eliminate our weaknesses) without needing to waste a move. It ends up here that 1…d5! does indeed work with calculation. If White responds with 2. exd5 then we can play 2…Nxd5! (Playing 2…Rd8 and 2…Bxd5 also work for similar reasons) 3. Nxd5 Bxd5 4. Qxd5?? Rd8! skewering white’s queen to the rook on d1 when White loses material. Even if White doesn’t take the bishop on d5, then we can retreat the bishop next move and have been able to open the position for our bishop pair and eliminate our weaknesses on the d-file at the same time. This is a very nice improvement of the position and a good showcase of the intersection between positional play and calculation. I consider a lot of what we’ve looked at in this blog post as “positional calculation” and this is something that separates strong players.
In conclusion, we should constantly be looking for ways to dictate the pace of the game and control the position ourselves as much as possible. If you ever start to feel the need to react to an opponent’s move and play passively then pause and see if you actually need to react or if the opponent’s “threat” is not a real problem. Also, if there’s a positionally desirable move that you would like to play but it doesn’t look like it works on first glance, ask yourself “What if I do it anyways?” and calculate. Sometimes you will not be able to impose your will on the position but you’ll be surprised how often it actually is possible and we would only be limiting ourselves to think otherwise.
Hopefully these tips and advice will help you out in your own games! Let me know in the comments what you thought of this blog post. Finally, if you enjoyed this post then feel free to subscribe to the blog below and share it with your friends :-)
Finally, if you want a few more exercise positions to solve then you can look below. Figure out what your positionally desirable move is and make it work using calculation. These positions can be quite difficult so I recommend taking your time and not rushing your calculation. The answers will be at the bottom of the post:


I’m not really sure what the chances were that every single one of the positions in this post would end up being Black to move! What a coincidence!
ANSWERS:
#1: 1…Nge7! (White was “threatening” Bxa4 but this isn’t actually a concern for us. Instead of defending against this “threat” with a move like …Qa6, we can focus on developing a new piece and get closer to castling instead) 2. Bxa4 (Black will castle kingside against the majority of other move options) 2…Nxe5! (Opening a discovered attack towards white’s bishop on a4) 3. Bxd7 Nxd7 (We have been able to trade off white’s central e5-pawn for our a4-pawn. This is a favorable pawn trade for Black)
#2: 1…e5! (We have the bishop pair and white’s king has trouble getting out of the center quickly. We should be looking to trade pawns and open the position) 2. fxe5 Bxe5 (recapturing with the knight would work too. White cannot capture the bishop on e5 due to …Qxe3+ and …Qxe2# afterwards. If White cannot capture the bishop then Black has been able to open the position quickly without needing to prepare the …e5 pawn break first)
#3: 1…d4 (Black wants to advance their pawn majority and kick away white’s knight from defending the e2-pawn) 2. Rad1 (White pins the d4-pawn and attacks it. This is the critical test of black’s …d4 move) 2…Qb7! (Getting out of the d-file pin and hinting at discovered checks towards white’s king. White cannot capture the d4-pawn without allowing …c5+ which would win material) 3. Nb1 c5+ (Black has been able to mobilize their queenside pawn majority. Note that after the king moves then playing …Rxe2 is not possible since Qc4+ would win the rook)
#4: 1…Nf6! (We can make a positionally desirable move and attack white’s queen instead of needing to defend against Qxe5. As long as we calculate correctly!) 2. Qxe5 (Any other queen move gives Black easy play) 2…Bd6 3. Qg5 (capturing the pawn with 3. Qxd4 would run into 3…Bh2+ and 4…Qxd4) 3…h6! (We’re able to ignore another “threat” since capturing the g7-pawn gets White in trouble) 4. Qxg7 (Retreating with 4. Qh4 would run into 4…g5 with the queen being trapped) 4…Rh7 (White’s queen ends up trapped and Black emerges ahead material)
#5: 1…c5! (Black wants to trade off their weak c6-pawn) 2. Nb5 (hitting the queen and opening the rook to attack the c5-pawn. This is the critical test of black’s …c5 move. Any other move would give Black easy play) 2…Qb6 (Counterattacking the knight. Other queen moves work too with slightly different sequences) 3. Rxc5 Ne4! (looking to kick away the rook from protecting the knight) 4. Nd7! (White has a counterattacking resource of their own) 4…Qa6 5. Nc7 Qb7 6. Rc2 Rfc8 7. Qc1 Nxf2! (Opening the threat of …Bxc2) 8. Rxf2 Rxc7 9. Nc5 Qb5 (Black has equalized the material and created weaknesses in white’s position. Their king has trouble castling and the e3-pawn is weak. Black has no weaknesses in their own position).
#6: 1…0-0! (This is one of my favorite exercises from the book “Recognizing Your Opponent’s Resources” by Mark Dvoretsky. Castling kingside is the move we want to play. But we need to anticipate white’s most testing response) 2. Qd2! (attacking the knight on d7 and helping to pin it to our rook on d8) 2…Qa8!! (A VERY hard move to find but it can be deduced through the process of elimination. All other moves lose material or get us into trouble) 3. Rxd7? (Capturing the knight ends up not working out for White but this is the critical variation for us to have an answer for) 3…Rxd7 4. Qxd7 Rd8! (White ends up losing material due to the skewer on the d-file towards white’s rook on d1. This reminds me a bit of the variation in the third position in the post above)
Great article sir!